I have to confess something: I think I fell in love. I feel exceedingly guilty for cheating on my Sportster this way, and I am sure I will never live it down. I just don’t know how you can say “no” to a wide front tire flattening the road out for you, a lower center of gravity that comforts you during those harder-leaning turns, and handling that essentially lets the bike drive itself.
I honestly felt like riding this bike was like taking all of the good parts of riding and all of the good parts of driving a car and blending the two together. You get the freedom and openness of a motorcycle, but the comfort of a car. The seat was much easier on my tailbone than that Road King – much more supportive and I didn’t feel a distinct ache in my butt after riding it for two days.
What’s with the tiny saddle bags though? It seems like slightly larger ones could be attached without sacrificing much in the way of looks. All Heritages come standard with saddle bags, but if you plan on taking this thing on a road trip, make sure you make good use of the luggage rack on the back.
Also, ladies, you really can’t beat the looks you get while you’re riding around on this thing. Like my experience with the Road King, I got a lot of double-takes. While stopped at a stoplight in the middle of a construction zone, I enjoyed a few hoots and hollers. Can you tell I’m a bit of a show-off?
More and more I’m believing that while these bikes such as the Road King and Heritage are larger and LOOK more intimidating, they are so much easier to handle than the smaller Sportsters or other “beginner” bikes. I’d love to see if someone sitting on a bike for the first time could handle something like this, because I really believe that the size wouldn’t be an issue once they got moving. You barely feel the bike underneath you. Obviously you’d want to mess around on a dirt bike a little first, just so you know how to work a clutch and shift gears before getting on something larger, but after that, I think beginners would find these easier to handle and safer to ride than most of the standard “beginner bikes” out there. Thoughts, anyone?
Thursday, August 30, 2007
Bike Review: 2007 Harley-Davidson Heritage Softail
Friday, August 24, 2007
Exercises for Riders
Today I’d like to tie together two of my favorite subjects: fitness and riding. I think it’s extremely important to be in good physical condition when you ride. Even if you are not striving towards a particular fitness goal or trying to lose weight, there are things you can do to benefit yourself and make riding a motorcycle more comfortable and enjoyable and to avoid injury while you are riding, especially if you plan on going through areas with rough terrain that can be hard on your back, neck, and shoulders.
First of all I want to mention that any exercises you do should be preceded by a warm-up – generally about 5 minutes of doing some simple cardio such as going for a walk, doing a few jumping jacks, or any other activity that gets your heart rate slightly accelerated, thereby warming up your muscles. You should then stretch whichever muscles you intend to work. A good stretch lasts for a count of 10 to 15 seconds at least.
The areas I think most concern riders include leg strength; back, neck, and arm comfort; and balance. You must have all three to be ready to ride and have an enjoyable riding experience. Here I will introduce a few basic exercises focusing on these areas:
1) Leg strength. This is important simply because when you aren’t moving, you typically have to have at least one leg down to keep your bike upright while you wait to get into motion again. It can also be a factor in keeping yourself astride your bike and being able to cope with issues where leg strength is important, such as a drop or accident situation.
Squats are an excellent overall leg exercise. They especially work your butt and thigh areas. You will generally want to do 15 squats at a time, for a total of 2 sets (30 squats total). This focuses particularly on endurance rather than bulking up; if you are looking to build muscle mass, then 3 sets of 8 squats with weights as heavy as you can manage will do this for you.
A correct squat is done keeping your back isolated and straight. You want to keep your knees and ankles aligned as much as possible. If you have access to an exercise ball, I suggest standing with the ball between your back and the wall and using it to support your weight while making a motion similar to sitting down in a chair. Otherwise you can also counter-balance your weight while standing without support and holding a set of dumbbells out in front of yourself while performing the squat.
Another good leg exercise to consider is working your hip abductor and hip adductor muscles. Remember all those exercise videos from the ‘80’s with the ladies in leg warmers doing leg lifts? That’s what I’m talking about. Do this: lie on your right side with your left leg on top. Do 15 leg lifts with your left leg. Then bend your left leg so it is folded across your right leg. Lift your right leg 15 times. Repeat. Then roll over and do the reverse while lying on your left side. You will notice a difference in the muscles used.
2) Back, neck, and shoulder exercises. These are exceedingly important to a rider. We don’t have the same kind of support on a motorcycle as we do in a car, so it takes some amount of strength to maintain a good riding posture. We also can endure some pretty rough bumps and wind resistance, loaning to some discomfort if we aren’t prepared. A few small stretches and strength exercises can go a long way towards preventing injury and making your ride more comfortable.
Yoga is one of my favorite things to do for this area; it has wonderful stretches and positions you can do that do not put a lot of strain on you but provide beneficial elasticity and strength.
First, the cobra pose; this stretches and strengthens your lower back and is a wonderful stretch for your entire spine, as well as strengthening your shoulders. Lie on your stomach with your hands placed beneath your shoulders. Breathing in, push up with your arms while arching your back – your feet and legs should remain on the ground; you aren’t doing a push-up. Only your upper-body should leave the ground. Look up at the ceiling. Inhale and exhale six times. Exhale out of the pose. Do this two or three times. If you want to check how much you are supporting yourself with your back instead of your arm muscles, lift up your hands for a second or two and see how far down you go.
Second, the toe-touch and roll-up. Start out standing with your feet shoulder-width apart in a neutral position, your arms and shoulders relaxed. Slowly roll down, letting your arms dangle and hang loose, until you are as close to touching your toes as is comfortable. Hang there for a moment. The focus here is not on stretching your calves or legs, but just letting your back hang loose and stretch while you are bent over at the hips. When you are ready, slowly roll up, vertebrae by vertebrae. Take your time – if this takes you shorter than 30 seconds to do, you are going too fast! This is wonderful for re-aligning your spine.
The neck is an area where many people store a lot of their tension. It is important to ensure the muscles here are relaxed, yet strong enough to support your head and keep your spine in alignment. Tilt your head to the right, keeping your eyes focused forward. Raise your right arm and gently pull your neck towards your shoulder – do not over-do it, just apply enough pressure that you feel a stretch. Repeat with the left side of your neck. Another exercise to try is to look over your right shoulder as far as you can. Then look forward and keep your neck straight up and down. Press the right side of your head against your right hand as hard as you can for 10 seconds. Look over you right shoulder again… see the difference in how far you can turn your head?
3) Balance. Balance is important for when you are doing slow-speed riding, because your bike has less momentum to keep itself upright. Most drops occur while you are going slowly.
First, a basic balance exercise: stand on one leg, while bending the other and holding your foot in your hand. If you are having a hard time with this, try focusing on one spot in front of you. Concentrate on it; you are basically fooling yourself. When your eyes are in motion and you are looking around, your body thinks it is moving in a certain direction and is trying to adapt. If you focus on one spot, your body is at rest and easier to balance.
Feeling a little more ambitious? Try the headstand pose! Start in a seated position on your knees. Then slide forward so you are resting on your knees and elbows with your fingertips together. Bend down and rest your head between the V created by your hands. Straighten your legs so you are resting on your head, elbows, and toes. Then slowly straighten your back until your legs are elevated off of the ground. Straighten your knees. You’re upside down!
This is a more advanced pose. Don’t get frustrated if you can’t do it right away. Maybe even try it against a wall to start out with. Have some fun!
All of these should be helpful in building strength and balance to make your riding more comfortable and enjoyable. Ride safe!
Friday, August 17, 2007
Installing a Sissy Bar on a Sportster
A while ago, I made the decision to install a sissy bar on my 2007 XL50 Sportster. I figured why not – you never know when it will come in handy. Even if you don’t plan to ride with a passenger, if you are a beginning rider and ever drop your bike, the sissy bar is a good place to grab it while you are trying to lift it back up! While this modification is relatively simple, it takes a bit of strength and is often a tight fit when trying to maneuver around chrome and painted pieces without scratching anything.
Also, just so you are aware how most motorcycle manufacturers sell their sissy bars: you often must by the side plates, sissy bar, and back rest pad separately. The side plates are what mount to the frame of the bike; the sissy bar is the actual backrest bar; and the back rest pad is what makes it comfy to lean against. Make sure all of your parts are the correct size for your bike... I failed to do this initially and it caused a bit of grief during the whole process. Needless to say, we finally got the job done. Here is how we did it.
Step 1: Take out the bolts along the rear fender around your turn signal assembly. Some of these will have nuts holding them in place, or threaded clips. Be careful while loosening your turn signals to ensure you do not damage the wiring. Keep them in order – I suggest putting them in labeled baggies to make sure you don’t get them confused when you are re-assembling. Always used the correct-sized tool when making modifications on your bike so you do not strip anything.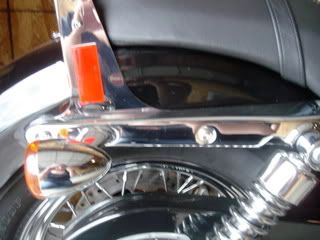
Step 2: Install the side plates between the rear fender and the frame. This is the tricky part. There are a few small pieces in the fender which might bend and keep you from being able to wedge the side plates down in there, so be careful of that. It’s common to have a few paint scratches whenever you do this part. Also make sure the notch on the side plate lines up with the wiring for your turn signal. Note: many sissy bars don’t have this setup and instead mount on the outside of the frame instead. This makes them a bit easier to install. 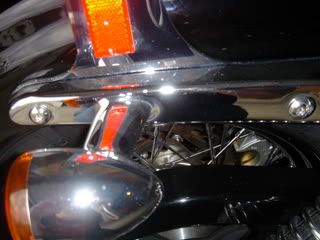
Step 3: Reassemble the bolts. This is also a little tricky, and you will quickly know whether or not you lined your fender and bolt holes up correctly.
Step 4: Place sissy bar. This is easy, just takes a little bit of pushing. Bolt it on with the parts provided in your kit.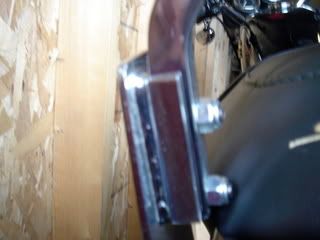
Step 5: Install the back pad. The easiest part of the whole process – just turn a few screws and you’re done!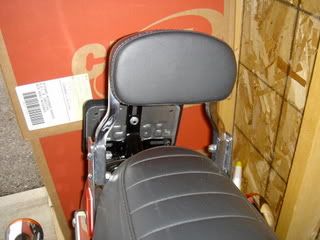
Be careful of your paint job with this installation. Also make sure you have the correct parts. I got my sissy bar assembly as a gift, and it turns out we had the wrong sized sissy bar! We re-installed the side plates a couple of times while trying to figure out what was wrong before heading over to our nearest Harley shop to exchange the part (note: you always have to do returns and exchanges at the shop you got it from). Enjoy, and make sure your man knows who will be on the back next time you two go for a ride!
Note: different bikes will have different instructions, so make sure to read the literature in your particular kit before embarking on this endeavor. Lady Rider Online will not be responsible for incorrectly installed sissy bars as a result of this article – always make sure you follow the directions that come with your kit for your particular bike.
Friday, August 10, 2007
Installing an Engine Guard on a Sportster AND How to Take Care of a Stripped Bolt
An engine guard is a good idea for beginners to have on their bikes. Often you’ll start out riding slowly in parking lots, and if you drop your bike at all, an engine guard will protect your legs and also prevent some types of cosmetic damage to your bike. Installation of an engine guard does not guarantee that you will always be protected, as they do not help much at higher speeds, hence the discontinuation of the name “crash bar.” However, they are a good idea if you plan to take a class that requires the use of your own bike or for your DMV test if it is on the usual parking lot range popular in most state exams.
Some engine guards on Sportsters require the removal of your horn assembly. Mine did not, but watch for this in the literature included in your particular kit. Lady Rider Online will not be held responsible for incorrectly installed engine guards or damage to your bike as a result of reading this article – always check the directions for your specific kit and bike before installation. It’s suggested you keep a towel or soft cloth over your front fender while doing this modification.
Here is how the engine guard will look once it's installed.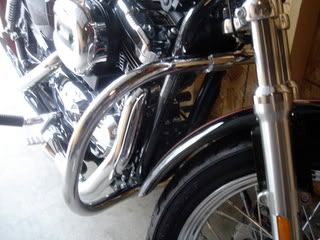
Step 1: Remove the torx head bolts on the front part of your frame, closest to your front wheel. Be careful to ALWAYS use the correct-sized tool when removing torx head bolts, as they strip the easiest and are the most difficult to remove. When I did this part, we ended up stripping one of the bolts; see below for how to tap a bolt if it gets stripped. Set these aside – you will not need them later but always keep the original parts from your bike modifications, just in case!
Step 2: Set the engine guard as it is supposed to sit on your bike. Make sure all of the bolt holes line up correctly.
This is how the top part of the engine guard attaches to the frame of your bike.
This is how the bottom part of the engine guard attaches to the frame of your bike.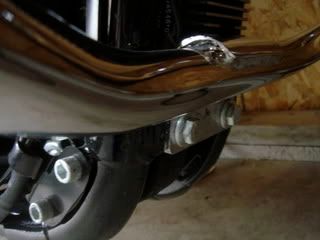
Step 3: Fit and tighten the bolts included in the engine guard kit. Whenever making a modification to your bike, make sure the bolts and screws are tightened; after you’ve ridden your bike for a couple rides after making a modification, go back and make sure nothing has rattled loose and make any appropriate adjustments if you need to.
Now, let’s say you ended up stripping one of your torx bolts. (Note: the bolts pictured are not torx bolts - torx bolts have fine, star-shaped slots) After cursing your luck, pull out your handy electric drill, and make sure you have a bit appropriate for tapping metal – there are many titanium bits out there that work just fine. You may go through a couple of bits while trying to do this, so keep a couple handy just in case.
You will have to drill into the bolt using your titanium bit and electric drill. Make sure you position yourself so that you go straight up into the bolt when you do this and don’t end up drilling at the frame. You are basically creating a new hole to use in unscrewing the bolt.
When getting your titanium bit, also pick up a bit to be used for extracting the bolt once it has been tapped. Be careful, as it’s easy to break your tap in the hole and not get it out. This, of course, happened to us. Once the hole is drilled, put on your tapping bit and affix it firmly into the hole. You may have to alternate between the drill bit and the tapping bit a few times to make sure you get a decent hold. Then, put your drill in reverse, and gradually work the bolt out.
If you break your tap, or simply cannot manage a good enough fit to get the bolt out, you may have to seek professional help at a motorcycle service department. I had to do this at my dealership, and they were nice enough to take care of it for me while I had my bike in for a recall. When I asked how they had managed to get the bolt out, I was informed the tech had just gripped it with a wrench and pulled it out. He’s been doing this for several years, however, so it’s not a feat I recommend performing if you don’t have the experience.
Thursday, August 2, 2007
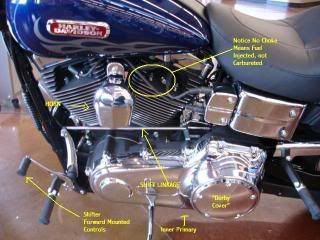
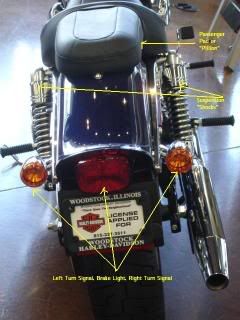
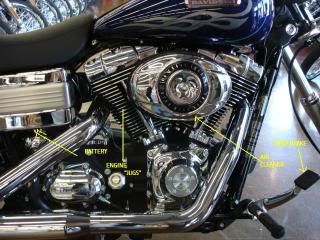
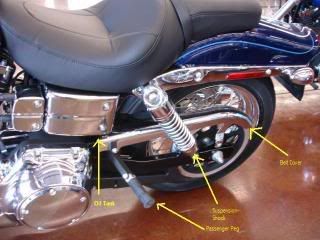
Bike Diagrams
I am still learning a lot about the parts that make up my bike. I've never been particularly technical-minded, but it's important to know a few basics so you can pinpoint problems or demonstrate some general knowledge. Here are a few diagrams, drawn up courtsey of the lovely miss Jessica Anderson, a fellow lady rider and motorcycle extraordinaire. The bikes pictured are both Harley-Davidson Dyna Wide Glides, both a brand new 2007 with fuel injection, and an older model with a carburetor and choke set-up.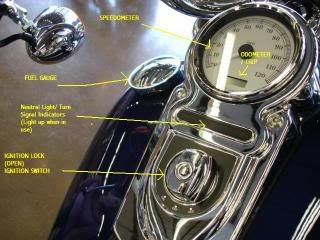
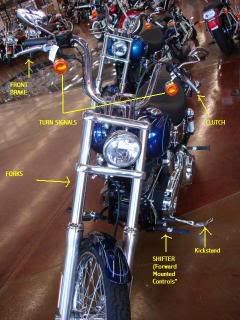

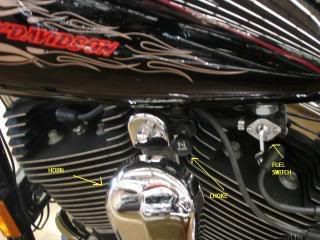
Coming soon: more up-close diagrams of the hand controls. It took me a little while to figure out what all those switches, buttons, and levers were supposed to be...