An engine guard is a good idea for beginners to have on their bikes. Often you’ll start out riding slowly in parking lots, and if you drop your bike at all, an engine guard will protect your legs and also prevent some types of cosmetic damage to your bike. Installation of an engine guard does not guarantee that you will always be protected, as they do not help much at higher speeds, hence the discontinuation of the name “crash bar.” However, they are a good idea if you plan to take a class that requires the use of your own bike or for your DMV test if it is on the usual parking lot range popular in most state exams.
Some engine guards on Sportsters require the removal of your horn assembly. Mine did not, but watch for this in the literature included in your particular kit. Lady Rider Online will not be held responsible for incorrectly installed engine guards or damage to your bike as a result of reading this article – always check the directions for your specific kit and bike before installation. It’s suggested you keep a towel or soft cloth over your front fender while doing this modification.
Here is how the engine guard will look once it's installed.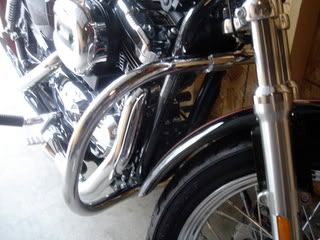
Step 1: Remove the torx head bolts on the front part of your frame, closest to your front wheel. Be careful to ALWAYS use the correct-sized tool when removing torx head bolts, as they strip the easiest and are the most difficult to remove. When I did this part, we ended up stripping one of the bolts; see below for how to tap a bolt if it gets stripped. Set these aside – you will not need them later but always keep the original parts from your bike modifications, just in case!
Step 2: Set the engine guard as it is supposed to sit on your bike. Make sure all of the bolt holes line up correctly.
This is how the top part of the engine guard attaches to the frame of your bike.
This is how the bottom part of the engine guard attaches to the frame of your bike.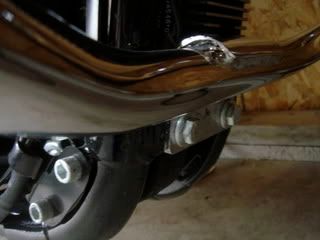
Step 3: Fit and tighten the bolts included in the engine guard kit. Whenever making a modification to your bike, make sure the bolts and screws are tightened; after you’ve ridden your bike for a couple rides after making a modification, go back and make sure nothing has rattled loose and make any appropriate adjustments if you need to.
Now, let’s say you ended up stripping one of your torx bolts. (Note: the bolts pictured are not torx bolts - torx bolts have fine, star-shaped slots) After cursing your luck, pull out your handy electric drill, and make sure you have a bit appropriate for tapping metal – there are many titanium bits out there that work just fine. You may go through a couple of bits while trying to do this, so keep a couple handy just in case.
You will have to drill into the bolt using your titanium bit and electric drill. Make sure you position yourself so that you go straight up into the bolt when you do this and don’t end up drilling at the frame. You are basically creating a new hole to use in unscrewing the bolt.
When getting your titanium bit, also pick up a bit to be used for extracting the bolt once it has been tapped. Be careful, as it’s easy to break your tap in the hole and not get it out. This, of course, happened to us. Once the hole is drilled, put on your tapping bit and affix it firmly into the hole. You may have to alternate between the drill bit and the tapping bit a few times to make sure you get a decent hold. Then, put your drill in reverse, and gradually work the bolt out.
If you break your tap, or simply cannot manage a good enough fit to get the bolt out, you may have to seek professional help at a motorcycle service department. I had to do this at my dealership, and they were nice enough to take care of it for me while I had my bike in for a recall. When I asked how they had managed to get the bolt out, I was informed the tech had just gripped it with a wrench and pulled it out. He’s been doing this for several years, however, so it’s not a feat I recommend performing if you don’t have the experience.
Friday, August 10, 2007
Installing an Engine Guard on a Sportster AND How to Take Care of a Stripped Bolt
Subscribe to:
Post Comments (Atom)
No comments:
Post a Comment